
Image Processing with Intel Realsense for Digital Interactive Installations (1/3)

This is a three part post on using Intel's Realsense depth cameras in a digital theme park, particularly for detecting people from a top-view position. The detected positions are used as input to provide visual effects projected back onto the floor, or in some cases, onto a ball pool.

The following image will probably better explain the setup used.


If you look closely, there are three Realsense cameras attached to the ceiling close to the projectors.

The targets of the project are:
  • We want to project wave ripple effects whenever someone is present.
  • The effect center is where the person is standing and ripples out just like a ripple in the water.
In this first part, I will share how we decided to detect a person using Realsense D415 cameras.

Person Detection Process

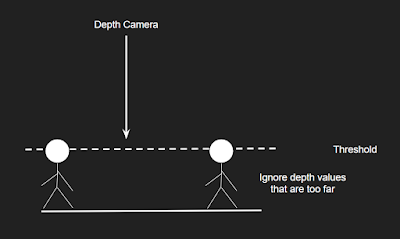
There are several ways to detect people, but since we do not need a very accurate position information I found that one of the easiest ways is to utilize Realsense's depth sensor to detect people's heads. This is done by thresholding the depth image at a certain value as shown in the following figure.


In the actual implementation, because I need to detect kids as well as adults, I ended up using two range values as thresholds.

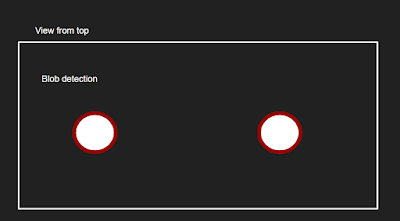
After thresholding depth, we get an image similar to the image below.

In reality, the image is noisy and the blobs are not clean circles. However, the above illustration should convey the general idea of the algorithm. Therefore the output of the sensor is an array of blob positions that correspond to people's positions.

[(x1, y1), (x2, y2), ... , (xn, yn)]

Keep in mind that the above positions are seen from one Realsense device, with a resolution of 1280x720. In the next part, I will share on the data merging between several Realsense cameras.

Appendix : Trial and Experiments

When considering how to easily detect people from top view, and still maintain a certain accuracy, I tried to implement the detection method using paper cups as experiments. It took several tuning and experiments before I could be sure the method would work relatively well.

Paper cups taped to the wall and detected by the depth camera

This setup also served as the basis of multi camera calibration for my system later on.

The paper cups height from the wall

As seen in the image, the depth camera was able to determine the height (depth) of the paper cups. This eventually became the base for the people detection system mentioned in the previous section.

See Part 3 here: http://www.dailytinkerer.com/2020/04/image-processing-with-intel-realsense_18.html


Comments

Popular posts from this blog

Installing a custom ROM on Android (on the GT-N8013)

It's been a while since my last entry and since it is a new start in 2019, I thought I'd write something about "gone with the old and in with the new". I've had my Samsung Galaxy Note 10.1 (pnotewifi) since 2014, and it's one of the early Galaxy Note tablet series. It has served me well all this years but now it just sits there collecting dust. My old Samsung GT-N8013 I've known a long time about custom Android ROMs like CyanogenMod but has never had the motivation to try them out, until now ! Overview of the process For beginners like me, I didn't have an understanding of the installation process and so it looked complicated and it was one of the reasons I was put off in trying the custom ROM. I just want to say, it's not complicated at all!   Basically you will need to Prepare an SD card and install Android SDK (you need adb ). Install a custom boot loader ( TWRP is the de facto tool at the moment). Use adb to copy custom...

Pitfalls during Training and Object Detection with TensorFlow for Absolute Beginners

This article is based on the great tutorial here on how to train and detect custom objects with Tensorflow. I also referred to the official documentations here and  here  for running Tensorflow model building locally. It was my first custom detection project and I faced some hiccups along the way and this article is to log and share my finding so it can help other beginners like me. In the end, I managed to train a tensorflow model to detect Batsumaru , a character from Sanrio. This is how the detection will look like. The tools Windows 10 Pro 64 Tensorflow originally 1.7.1 and upgraded to 1.12.0. I will share the reason later. Python 3.5.4 LabelImg for image labeling PyCharm IDE Steps and Pitfalls Some of the mistakes I made and other discoveries when following the guide. I will not repeat the steps mentioned in the original guide, but only the parts where I had to deviate from the walkthrough and found out things by myself. The training and...

Unity Best Practices for Beginners

Unity is a fabulous tool for not only games but also interactive entertainment, simulations, etc. And there are many good tutorials on tips and tricks to optimize performance and code readability. I compiled this list as a memo to myself when starting out on Unity, so I can always refer back to the basics and hoping that this can help someone else too. Object pooling. Object pooling is a pretty cool trick and it improves performance because you can reduce the number of Initiate() and Destroy() calls. To illustrate why Destroy can be bad, I attached a screenshot of a project I was building with Unity. I'm not going to go into the details of Object Pooling because there are already many good tutorials out there. One of them being this one.  One thing to always keep in mind is that it is easy to get MissingReferenceException if you accidentally Destroy() the pooled objects. It happened to me once where I attached one script to multiple prefabs which behave the same except that so...